Inside Ultimate - Part 3: The Loader
Last time, we learned how the injected code is interacting with Delphi controls. Now it’s time to find out how the code is getting injected in the first place!
The so-called “loader” is responsible for this task. As explained in part 1 of this serie, it’s part of ultimate.dll – rpg2009.exe does nothing more than calling the exported function “LdrMain” in ultimate.dll.
Let’s follow the loader’s work step by step, beginning with the press of the “RM2k”, “RM2k Value” or “RM2k3″ button. After saving the settings to the ultimate.ini file, it fills out the “StartRMData” structure with the chosen RM version and project path and starts the “StartRM” function in a new thread.
Now, StartRM has to tell the RPG Maker which project to open. This is using the “remember last project” feature of the RPG Maker (if you close the RPG Maker, it re-opens the project next time you open it). And here is the first important reason why there are three different buttons for starting RM! It’s because the RM2k, the RM2k Value! and the RM2k3 all use different locations to store the “last project” setting, and also different locations to store the “ApplicationPath” – which is needed to tell the loader where the actual RPG Maker executable is located!
RM2k:
ApplicationPath in HKCU\SOFTWARE\ASCII\RPG2000
Project in RPG2000.ini file in RM folder
RM2k Value!:
ApplicationPath in HKCU\SOFTWARE\Enterbrain\RPG2000
Project in HKCU\SOFTWARE\Enterbrain\RPG2000
RM2k3:
ApplicationPath in HKCU\SOFTWARE\Enterbrain\RPG2003
Project in HKCU\SOFTWARE\Enterbrain\RPG2003
In all cases, the project is stored in two parts: An “OpenedProjectFolder” value and a “ProjectBasePath” value. If the last project was, for example, “c:\users\cherry\rm\test”, the OpenedProjectFolder would be “test” and the ProjectBasePath would be “c:\users\cherry\rm\”.
The loader reads the ApplicationPath in order to find the RPG Maker’s location and writes the right values into the registry in order to have the right project loaded. An exception is the RM2k (not Value) because it’s using an INI file. Earlier versions of Ultimate wrote the INI file in the loader, but then I got bug reports stating that Ultimate would load the wrong project in RM2k on Windows Vista/7. The reason is that due to the User Account Control security system in Vista/7, the RPG Maker is unable to write to the RPG2000.ini in the directory where the executable file is located, instead Windows transparently redirects all attempts to access the INI file to a “compatibility files store”, unless the RM2k is started with administrator privileges. This means that Ultimate won’t write to the right file, since the file is actually in the “compatibility files store”! The solution here is that a “TODO: Write INI file” flag is set and passed to the injected code in rpg2000.exe once it’s started, so it’s the rpg2000.exe (from the OS’ point of view) which is writing to the file, hence the same redirection applies and everything works fine. ![]()
Now, the actual RPG Maker process (rpg200X.exe) is started. Here, the CREATE_SUSPENDED flag is used, causing the newly spawned process not to start right away, but instead it’s “paused” at the first possible moment (before any of the RPG Maker’s code is run). This way we can do our initialization tasks without RM interference.
Now, the memory of the new process is scanned. I know that the base address of the rpg200X.exe is always 0x400000 and the interesting range of memory is between 0x401000 and 0x680000, so I hardcoded these values as boundaries for the memory scan. The loader is scanning for the following patterns:
- “TFormLcfBase” – This is used as “identifier” in order to find out whether this is really a RPG Maker executable file. If this string is not found, you get an “This is not an RPG Maker file” error. (Note that this implies that the rpg200X.exe mustn’t be packed by UPX or otherwise!)
- “LcfMutex” – The RPG Maker uses a mutex for the single-instance check. This is the mutex name. Remember that the RM2k9U has a “up to 100 instances” feature! The loader replaces the mutex name with “ULTMTX??”, where the questions marks are actually an instance ID. The first instance of RM2k9U gets “ULTMTX00″, the second one “ULTMTX01″, and so on.
- “RPG_TEMP” – The RPG Maker uses a directory with this name (inside the Temp directory) to temporarily store map files. It’s important that we change this name too, so that multiple instances won’t interfere with each other (thus causing data loss). The loader replaces the name with “ULTTMP??”, where the question marks are the instance ID again.
- “Runtime error” – This is the first string after the actual program code in the rpg200X.exe (at the point where the data begins). It’s used to identify the end of the code section, memory scanning is stopped here.
Next, the entry point (the address at which execution of RPG Maker’s code starts) is located. There would be several approaches: First, I used GetThreadContext to get the newly created (and suspened) thread’s context and used the “eax” register of the context. This was the quickest solution, but it relied on undocumented behavior and thus it didn’t work with Wine. I then opened the rpg200X.exe file on disk instead and navigated through the PE header in order to find the entry point. But since I started using the Microsoft Detours library for function hooking (before, I manually hooked every function), I changed the entry point detection code again – now it’s using DetourGetEntryPoint:
' First, load the rpg200X.exe module
' But since it would crash if it was loaded like a DLL,
' we'll load it which LOAD_LIBRARY_AS_DATAFILE
Var hModule = LoadLibraryEx(RMAppCmd, NULL, _
  DONT_RESOLVE_DLL_REFERENCES Or LOAD_LIBRARY_AS_DATAFILE)
' The last 2 bits of the HMODULE need to be cleared
' They are set because of LOAD_LIBRARY_AS_DATAFILE
Var hModule2 = Cast(HMODULE, CUInt(hModule) And Not 3)
' We can now use DetourGetEntryPoint
' However we need to do a bit of math because
' the base address is almost certainly
' wrong since rpg200X.exe is not the main
' module in this process
' We know that the image base of the RPG Maker
' is 0x400000
Var EntryPoint = CUInt(DetourGetEntryPoint(hModule2)) - _
  CUInt(hModule2) + &h400000
' The module can now be freed again
FreeLibrary(hModule)
Now the really dirty work begins. We need to set up a code cave containing code which loads the ultimate.dll (in the rpg200X.exe process) and calls the Init function. Yes, it’s right that a DLL can execute code when it’s loaded, but 90% of our work cannot be done this way – that’s why the Init function is needed.
Before we continue, we need a way to remotely allocate and write memory in the rpg2000.exe/rpg2003.exe process (remember that the loader is running in the rpg2009.exe process). I created the following two functions for this task:
' assign memory at the RM's process and writes data to it
Private Function RemoteDataAsg(p As Any Ptr, l As UInteger) _
  As Any Ptr

  If l = 0 Then Return NULL
  Var addr = VirtualAllocEx(LdrData->hProcess, NULL, l, _
    MEM_COMMIT, PAGE_EXECUTE_READWRITE)
  If addr = NULL Then Return NULL
  WriteProcessMemory(LdrData->hProcess, addr, p, l, NULL)
  Return addr
End Function

' assigns memory at the RM's process and writes a string to it
Private Function RemoteStrAsg(s As String) As Any Ptr
  ' the "+ 1" is needed because of the string terminator
  Return RemoteDataAsg(StrPtr(s), Len(s) + 1)
End Function
Oh wait, what’s a code cave? Let’s ask this guy:
A codecave can best be defined as “a redirection of program execution to another location and then returning back to the area where program execution had previously left.” In a sense, a codecave is no different in concept than a function call, except for a few minor differences. If a codecave and a function call are so similar, why do we need codecaves at all then? The reason we need codecaves is because source code is rarely available to modify any given program. As a result, we have to physically (or virtually) modify the executable at an assembly level to make changes.
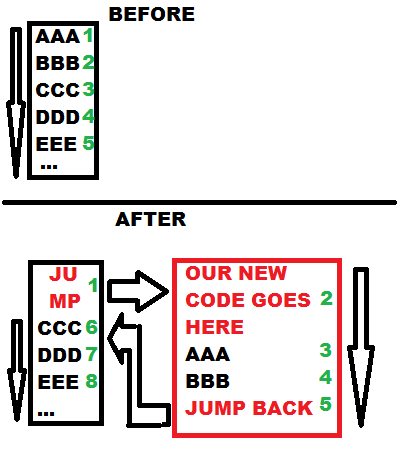
In this case, we will put our redirection at the very first instruction of RPG Maker’s code. Be warned, there is assembly involved here. In order to achieve the desired result, we need to replace part of the RPG Maker’s code (the first instructions) with a “jump to our code” instruction. Our code then has to do its work and at the end it has to jump back to the RPG Maker’s code. But wait, we just overwrote it! The solution here is to copy the overwritten instructions, execute them at the end of our own code and then jump back at the point after the end of the overwritten instructions.
A very simple painting visualizing the change:
Now we need a bit of assembly. Most important, we need a instruction for “jumping”. Normally we would use “jmp” – the downside is that it’s using a relative offset (the address given is relative to the next instruction after the “jmp”) – to avoid the math, we can use a “push” instruction followed by a “retn” instruction. (”push” pushes a value on the stack, “retn” pops a value from the stack, treats it as address and jumps to it.)
A “push” plus a “retn” instruction need together 6 bytes of space. Now we have to look at the first instructions of the RPG Maker’s code at the entry point:
00588D78 >/$ 55             PUSH EBP
00588D79  |. 8BEC           MOV EBP,ESP
00588D7B  |. B9 05000000    MOV ECX,5
00588D80  |> 6A 00          /PUSH 0
00588D82  |. 6A 00          |PUSH 0
00588D84  |. 49             |DEC ECX
00588D85  |.^75 F9          \JNZ SHORT RPG2003.00588D80
This is output from the OllyDbg debugger. The first column is the address at which each instruction starts, the second column contains the actual bytes in memory, the third column shows the assembly interpretation of the bytes.
We need 6 bytes for our “push+retn”. The first instruction in the existing code is “push ebp”, which takes 1 byte. The second one (”mov ebp, esp”) adds another 2 bytes, making a total of 3 bytes which is still not enough. The third instruction (”mov ecx, 5″), however, makes it 8 bytes – this is enough space for our “push+retn”. This means, we need to copy the first three instructions (8 bytes) and preserve them for later. Analyzing different RPG Maker versions reveals that the first three instructions are always the same, except for the value “5″ in “mov ecx, 5″. This is no problem, however – because we know that the length (8 bytes) is always the same, we just need to copy these 8 bytes and we are fine.
So, the first step is:
' get first 8 bytes from entry point
' (push ebp; mov ebp, esp; mov ecx, ?)
Dim StolenBytes As ULongInt
ReadProcessMemory(LdrData->hProcess, EntryPoint, @StolenBytes, _
  8, NULL)
This code reads the first 8 bytes from the entry point and stores them in the StolenBytes variable. ULongInt means it is a 64-bit variable, which is conveniently equal to 8 bytes.
Next, we allocate space for the path of the ultimate.dll file and write it into the RM’s process’ memory (using the previously explained RemoteStrAsg function):
Var a_dllpath = RemoteStrAsg(DllData->LoaderPath & "\ultimate.dll")
The variable a_dllpath now contains the address (in the RM’s process) of the string.
Now, we create our little DLL loader code (red box in the picture above). I wrote the necessary instruction in assembly and translated them into simple bytes which are put into an array. Note that not all of the bytes can be hardcoded – especially the addresses (of the string, etc.) will be filled in later. I used “NULL” for all bytes which are unknown yet, as a visual clue:
' create loader code which loads ultimate.dll and calls Init
Dim InitStub(54) As UByte = { _       ' Asm
  &h60, _                             '    pushad
  &h9C, _                             '    pushfd
  &h68, NULL, NULL, NULL, NULL, _     '    push a_dllpath
  &hB8, NULL, NULL, NULL, NULL, _     '    mov eax, offset LoadLibraryA
  &hFF, &hD0, _                       '    call eax
  &h85, &hC0, _                       '    test eax, eax
  &h75, &h09, _                       '    jnz @f
  &h6A, &h7F, _                       '    push 7F
  &hB8, NULL, NULL, NULL, NULL, _     '    mov eax, offset ExitProcess
  &hFF, &hD0, _                       '    call eax
  _                                   '   @@:
  &h05, NULL, NULL, NULL, NULL, _     '    add eax, (rva of Init)
  &h68, NULL, NULL, NULL, NULL, _     '    push hWndMain
  &hFF, &hD0, _                       '    call eax
  &h9D, _                             '    popfd
  &h61, _                             '    popad
  NULL, NULL, NULL, NULL, _           ' | stolen |
  NULL, NULL, NULL, NULL, _           ' | bytes  |
  &h68, NULL, NULL, NULL, NULL, _     '    push EntryPoint+8
  &hC3 _                              '    retn
}                                     ' End Asm
(Note: FreeBasic uses the last index when defining the array dimensions, unlike C and many other languages which use the array size. Thus (because arrays are zero-based), “InitStub(54)” means that it has actually 55 elements.) For assembly-illiterate people this will certainly look very confusing. Well, let’s express this function in C-pseudocode:
saveProcessorState(); // pushad + pushfd
HMODULE hModule = LoadLibraryA(a_dllpath); // push + mov + call
if(!hModule) ExitProcess(127); // test + jnz + push + mov + call
void (*Init)() = (void (*)()) (hModule + rvaOfInit); // add
Init(hWndMain); // push + call
restoreProcessorState(); // popfd + popad
/* stolen bytes (the first 3 instructions of RM code) here */
jumpBack(EntryPoint + 8); // push + retn
So, this function saves the processor state and tries to load the ultimate.dll. If it failed, the process is terminated with exit code 127 (0x7F). Otherwise it calls Init with the window handle of the loader window as argument (for inter-process communication), executes the 3 instructions we preserved in the StolenBytes variable before, restores the processor state and jumps back to the place right after the “stolen” instructions.
There is a little trick involved with calling the Init function, though. Since the ultimate.dll in the rpg2009.exe process might be loaded at a different base address compared to when it’s loaded in the rpg2000.exe/rpg2003.exe process, we have to get the RVA (relative virtual address) of it first. This is the address of the function relative to the image base. For example, if ultimate.dll is loaded at image base 0x840000 in rpg2009.exe, the address of the Init function might be 0x8417C0, in which case the RVA would be 0x17C0 (adress minus image base). If ultimate.dll was now loaded in rpg2000.exe/rpg2003.exe at image base 0x5A0000, this would mean its absolute address would be 0x5A17C0 now. We can get that address by adding the RVA (0x17C0) to the new image base (0x5A0000). Note: The image base is equal to the HMODULE we get back from LoadLibrary (unless special flags like LOAD_LIBRARY_AS_DATAFILE are involved, but that’s not the case here).
You might have noticed that we are calling two additional functions here: LoadLibraryA and ExitProcess. Both functions reside in kernel32.dll. We do not need any RVA calculation here, because kernel32.dll always has the same image base in all processes (that’s due to its internal usage by Windows).
Our assembly “function” is still incomplete, though. We have to fill in the “NULL” bytes now. For doing so, I wrote a little macro which helps me writing a pointer-sized (i.e. DWORD-sized, since we are using a 32-bit architecture) value into a byte-array (”_a_”) starting at a given offset (”_i_”):
#Define AInt(_a_, _i_) *CPtr(Any Ptr Ptr, @_a_(_i_))
Okay, let’s fill in the values:
' Address of ultimate.dll path string
AInt(InitStub, 3) = a_dllpath
' Address of LoadLibraryA
AInt(InitStub, 8) = GetProcAddress(GetModuleHandle("kernel32"), _
  "LoadLibraryA")
' Address of ExitProcess
AInt(InitStub, 21) = GetProcAddress(GetModuleHandle("kernel32"), _
  "ExitProcess")
' RVA of Init function
AInt(InitStub, 28) = CUInt(@Init) - CUInt(hInstance)
' Window handle of the loader's window
AInt(InitStub, 33) = DllData->hWndLoaderMain
' Stolen bytes (ULongInt = 64 bit = 8 bytes)
*CPtr(ULongInt Ptr, @InitStub(41)) = StolenBytes
' Target address for back-jump (8 bytes after original entry point)
AInt(InitStub, 50) = EntryPoint + 8
Now we can write the whole InitStub array (which is actually an executable function) into the RPG Maker’s process’ memory using the RemoteDataAsg function we defined before:
Var a_initstub = RemoteDataAsg(@InitStub(0), 55)
The variable a_initstub now holds the (remote) address of our “function”.
The next step is creating another array/function like this, but far smaller. This time, it’s the replacement for the first 8 bytes – the “jump-to-our-bigger-function” function!
Dim NewCode(7) As UByte = { _         ' Asm
  &h68, NULL, NULL, NULL, NULL, _     '    push offset InitStub
  &hC3, _                             '    retn
  &h90, _                             '    nop
  &h90 _                              '    nop
}                                     ' End Asm

' Replace NULLs with (remote) address to InitStub
AInt(NewCode, 1) = a_initstub
Remember what I told you about “push + retn”? That’s it! The additional two “nop” lines do nothing – “nop” means “no operation”. Actually, these lines are never executed at all, I am just putting them here because we would leave a part (2 bytes) of the original instruction here otherwise, and this would probably confuse my debugger.
We are almost done now! Let’s write the “NewCode” to the RM’s process’ memory – overwriting the first 8 bytes of the original code:
WriteProcessMemory(pi.hProcess, EntryPoint, @NewCode(0), 8, NULL)
The final step is resuming the RM’s (initial) thread:
ResumeThread(pi.hThread)
Now, the new code will run: First the “push+retn” which jumps to the InitStub, then the InitStub which loads the ultimate.dll and calls Init, then the stolen bytes (which are part of the RM’s code) and then the rest of the RM’s code. The Init function can then modify the RPG Maker and prepare RPG Maker 2009 Ultimate for action. ![]()
For completeness, I’ll show you how the entry point of rpg2003.exe looks in the debugger after the loader did its job:
00588D78 > 68 00001600      PUSH 160000
00588D7D   C3               RETN
00588D7E   90               NOP
00588D7F   90               NOP
00588D80   6A 00            /PUSH 0
00588D82   6A 00            |PUSH 0
00588D84   49               |DEC ECX
00588D85  ^75 F9            \JNZ SHORT RPG2003.00588D80
You can see, the InitStub was written to address 0x160000. Let’s have a look at it:
00160000   60               PUSHAD
00160001   9C               PUSHFD
00160002   68 00001500      PUSH 150000 ; ASCII "D:\rm\ultimate.dll"
00160007   B8 04288A76      MOV EAX,kernel32.LoadLibraryA
0016000C   FFD0             CALL EAX
0016000E   85C0             TEST EAX,EAX
00160010   75 09            JNZ SHORT 0016001B
00160012   6A 7F            PUSH 7F
00160014   B8 6F2A8A76      MOV EAX,kernel32.ExitProcess
00160019   FFD0             CALL EAX
0016001B   05 302E0100      ADD EAX,12E30 ; This is the Init RVA
00160020   68 44134F01      PUSH 14F1344 ; This is the hWndMain
00160025   FFD0             CALL EAX
00160027   9D               POPFD
00160028   61               POPAD
00160029   55               PUSH EBP ; These are
0016002A   8BEC             MOV EBP,ESP ; the "stolen"
0016002C   B9 05000000      MOV ECX,5 ; instructions
00160031   68 808D5800      PUSH 588D80 ; The jump-back target
00160036   C3               RETN
By the way: Maybe you already heard of another, easier method of injecting a DLL into a process, using CreateRemoteThread. I also posted sample code for this method some while ago. I could of course expand this method and not only load the DLL using CreateRemoteThread, but also call the Init function that way (in fact, very early versions of Ultimate actually used this method), but it wouldn’t work for me now: I need the Init function to be run in the same thread which creates the RM’s user interface later, i.e. the main thread, otherwise I cannot interact with and modify it. However, the CreateRemoteThread method – as the name says – would run the code in a new thread.
That’s it, folks! I am not sure what I should explain to you next time – this might as well be the last article about Ultimate’s internal workings… unless I have an idea of another nice topic which is worth writing about – or you: just leave a comment if there is something in particular which you want me to explain!
2 Responses to “Inside Ultimate – Part 3: The Loader”
-
dragoon says:
2014/02/25 at 21:47
Wonderful series of write-ups. I loved them. I’d like to see you write some more about how you got into reverse engineering, the learning process, the tools, why you chose FreeBasic, etc. I love the idea of RE and understanding things.
-
Cherry says:
2014/06/20 at 8:43
FreeBasic kind of happened. I started programming in using a limited BASIC environment on a children’s computer, and then continued using QBasic for DOS… FreeBasic was a smooth landing because it’s 99% QBasic compatible out of the box (or at least it was back then – today you need to enable a special compatibility mode, because the language has evolved already). FreeBasic is a quite unusual language choice nowadays, but I still use it for quick and dirty stuff – testing ideas, writing a quick tool in 2 minutes, etc.
I am afraid, though, that I won’t have enough time to continue writing about RE, at least at the moment.
-